Saturday, 4 June 2016

Our design - Prototype to Final

Our design started to take its final form after the Expert and Heuristics evaluations. We now started to sketch on our prototype as seen in the blog post:

We used Invision as our tool to design the prototype.

Although we didn't set out to use an evaluation framework like DECIDE, and despite the linear progression of the course's exercises, the nature of the design process forced us to go back and iteratively re-evaluate our work and assumptions — especially the Exploration of questions and Determination of goals. Coming at these iterations with different assumptions and from new angles enabled us to triangulate our users and their needs.

Since the course didn't go beyond a basic (though high-fidelity, and without much horizontal or vertical compromise) digital prototype, it didn't have enough interactivity to meaningfully apply any GOMS model or investigate Fitt's law. We also didn't do any dedicated gathering of statistics from our users or evaluators in form of questionnaires or such. Which in turn means that nearly all of the data that informed our iterations was qualitative.

Furthermore, although we recognize the usefulness of user-centered design and making the users active stakeholders — especially in the face of having our assumptions changed/expectations managed by both the interviews and the think-alouds; what actually transpired was mostly what we'll humbly refer to as genious design. But an argument could be made that we were ourselves prospective users of the final product. This is especially true in the case of group members who had not been present during the creation of the app, who gave the group feedback from walkthroughs which resulted in several new functionalities being added.

We used pen and paper for our low-fidelity sketches, and used InVision as our prototyping tool for the final prototype. The GUI for the app reuses established mobile interface norms. 

An example of the iteration process for specific icons is seen in this blog post:


Our train icon combines similarity of the train shape with an analogy between available seating and colour (green is free, red is occupied). We also use the arbitrary but commonly established symbolism of a pointing arrow for "exit".

http://f5slattarna.blogspot.com/2016/06/proposed-changes-to-physical-metro.html

Our updates to the stations are static, but of course the users can interact with them — by choosing to read/look at them and choosing how much of their information they take in.

Here is a short summery of what the final design does:


  • Add more points of interest to the exit signs.
  • Make sure that all exits are color-coded.
  • Use color coding to show the different exits on maps on the stations.
  • Make the color coding clearly visible to the commuters, use lines/dots/arrows to guide them to their desired color.
  • The lines/arrows should guide users to their destination, improving the general people flow and reducing crowding.
  • Integrate the color coding system in the SL-App, it should tell users what exit color they should take.
  • On bigger and more complicated stations, add extra detail to the color-coding system, (inspired from Hong kong), using letters or letter-digit-combinations (A1, A2, etc). Same colors should be together however, to make it easier to find for the users.
  • Also let the SL-App tell users where they should sit on the train. It should inform
    • Where to sit that is closest to your exit
    • Where to sit if you want to avoid crowds.


Wednesday, 1 June 2016

Look how far we've come...

Design process starting from field studies.

To sketches of app and of adjustments to physical metro stations.

To a finished prototype! Click it!


Seriously, click it and check out the interactive prototype!

Proposed changes to the physical metro stations

Not all solutions are digital. Accompanying our app are these proposed changes to the physical metro stations:

The signs on the platforms (and at the entrances, not shown in picture) should include colour codes for the exits they inform of (the triangles). They could also incorporate more nearby locations of interest.

 
 Exits shown on maps should also have the colour codes. The encoding should be consistent between stations, for example always having pink exits in the forward direction of the trains toward one end station.

 Here's an early attempt at guiding the passengers to their exit. Can you spot all the flaws?

1) Guides on the ground won't be visible during rush hour when the platform is crowded. 2) Guides leading out from the doors will cross over each other ad nauseam. 3) A line of undirected guides might be seen by a traveller who then proceeds to walk in the wrong direction. 4) Round coloured guides is the established symbol for the metro lines, which would be confused with exits.

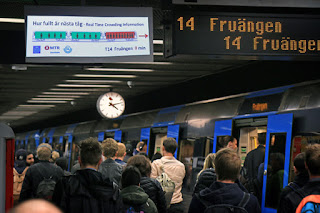
Crowding information for the oncoming train could be shown to everyone on the platform. (The picture is from a KTH study that tried doing exactly that.)

Friday, 27 May 2016

Creating our train icon

We need an icon for our app. The icon should show which section of the train is nearest the user's exit. The icon should also show how crowded the different parts of the train are.

So we need a symbolic representation of a train, an exit mark for that train, and a way to mark crowding in that train.

This symbolic representation should ideally show all the wagons and all the doors.
  • So that it becomes clear for users exactly where to go for available seating.
  • So that it's possible to indicate "short train" by removing a wagon from the icon.

This is a Stockholm metro train:
00 train.jpg

Below is a drawing of the rough proportions of the full metro train, with the standard set of 3 wagons and each wagon with 3 sections. 21 door pairs in total on one side:

01 longtrain.jpg
"I'm barely 2-dimensional! Choo-choo!"

If the above drawing would be shrunk down to fit in the app, it would look like a horizontal line. We have to change the proportions of the wagons to make the full icon recognizable as a metro train. 

When squashing the train horizontally it won't be possible to keep the details of all the doors and windows as was initially desired. Instead of 2-3 door pairs and 5-6 windows per section we'll reduce it down to 1 door pair per section and 1 window on the side of each entrance:

02 train.jpg


That’s not too far off what the real wagons look like. In the app we have about 320 pixels to fit the three wagons in:

03 tinytrain.jpg

That's still too long and thin.

The existing icons in the app (below) are 25 pixels high:
  04 other icons.jpg

So the proportions of the train needs to be about 12:1, making each wagon about 4:1:

05 loltrain.jpg

And let's simplify it further to the style used by the existing icons:

06 lineart.jpg

There we have it, now to join them together and mark where the ideal exit is:

07 full lineart.jpg

And we colour the exit arrow to the colour of the station's exit as a way to give additional information (accelerator) to expert users:

08 full lineart colored.jpg

And add a heatmap gradient of how crowded the train is:

09 full lineart colored heatmap.jpg

That heatmap is very visible, but it overpowers the visual symbol of the train. Let’s try to tone the heatmap down, keeping it strongest at the floor of the train where the people are actually standing and sitting:

10 full lineart colored heatmap diskretare.jpg

The colour palette of the heat map and the shape of the exit arrow was further adjusted to better fit when placed in the app, as can be seen in the prototype.

Monday, 2 May 2016

Summary of Think-Alouds


Everyone used a similar usability test on the prototype in form of answering:
Find the way from T-Centralen to Södermalmstorg using the prototype.

Some main comments from the think- alouds were:
-          App is clear. But there might me some frustrating excessive confirmation.
-          The crowding information should be on the platforms as well.
-          The red and green text should only be green at the word “red” and “green”.

Some of the most emotional reactions from the users of the prototype was that it was working or dong things for you that the “real” app does not. Maybe the prototype was too simple in to get focus on the main features.

The tests was done in a fast mention and without any longer breaks which might indicate that the app doesn't require the highest level of counciouss decisionmaking that interferes with spoken language that Gulan mentioned on his lectures.

The users understood quickly that the trains indicated crowding information but not in which way. The question mark, showing further information of the train icon, was in some case spotted and used but in others not used.  In the case where it was used the reaction was that it was understandable.

For our final design we should probably change the information in the app based on the feed- back and also change the symbols used for lines and exits (discussed in the “övning 5”).

Think aloud

The task during the think aloud was to, using the prototype, find the fastest way to travel between T-Centralen and Södermalmstorg using SL transportation, and where in the train one should be located. The test subject was Per, a 18 year old high school student.

Transcript (translated from Swedish) Ok, so I guess I click the SL app. And type the place I want to go in this field? [the user enters the locations in the prototype] Hmm ah, this route seems good. [the user selected the first route]
So, red line to Norsborg. Ohh, what does this train show? [the user clicks around a bit on the train, hitting the explanation button] Ah so it shows how crowded the train is. But why is the arrow not on the green part? [user looks a bit confused at phone, until he read the remaining explanation text] ok... that's good I guess, but what is the pink exit? [I show the user the image of leaving the train] pink arrows! So they take me to the best exit, if I follow them, I guess closest to where I want to be? Cool!

Q: why did you select the first route so quickly? Isn't that usually the first one arrive? At least in the app I used

Q: So you missed the explanation of the arrow first, how come? Well I was looking for what the train colors was, and their explanation was in bold color, so I think it just got my attention first

Reflection: The user quickly found his way around in the app, which was very good. It took a bit of time to get the explanations for all of the information on the route screen, however this should only be a problem the first time. The user found the experience very familiar to other applications, which enabled him to reuse trained behaviors from those context, like immediately choosing the first route because it is the fastest.


Think Aloud (Ludvig Janiuk)

Subject: 18-year old male, tech savvy but does not use sl app.

Task: Find the way from T-Centralen to Södermalmstorg using the SL-app in this prototype. Then imagine you are actually going that path and describe how you use the information you got.

Think-aloud: Ok so I want to use the sl app, I open it, I want to type the station [taps text field] oh, it appeared, ok, hm.. [small silence] So am I supposed to choose a route, or press "sök" first? Well here is a route that matches the stations so I'll just use it. [taps the first route] Oh, so now I have routes to choose from, Ok I'll pick the first [taps first route] ok this looks like it.

Me: Now imagine you are at TC and you just looked that up. How do you proceed to find your way to Södermalmstorg?

Think-aloud: Yes so I'm supposed to take the red line to Norsborg.. what's that train thing? [small silence] Does the color represent... places, right? How crowded it is? Can I press that question button? [presses it, then reads text that appears] Oh, so the color is for the exit later? Ok cool [presses cross to fold it] Now, I find the right train on TC and I use the door with the arrow because I can stand becuase it's just 3 minutes. Then I exit the train at Slussen and I'm going to look for a pink exit? [I show picture of exitting thru door] Oh ok, so I follow the pink arrows to the exit. Smart, so the phone knows about them. Then I just need to follow the arrows, right?

Me: Yes, that's it.

Analysis: I'm overall pleased, the subject had no problem grasping the train icon thing, but he was ofteh slow in how he proceeded. This maybe because he's not used to the sl app, and maybe becuase there's often a lot of information in the screen.


Individual think aloud

Assignment and user

Find an itineries from T-Centralen to Södermalmstorg and try figure out which part of the train that is most fittingly to travel in and also how to find the exit closest by Södermalmtorg.
User was Hanna 24 years old studying social science and travels daily between Slussen and T-Centralen where she transfers to another train. She uses iPhone and have never owned a smartphone running Android (which is the OS in the prototype).

Translated notes

- I'll start by opening the SL-app i assume (Taps the icon)
- Then I'll first write the origin of my travel (Taps the "my position" field)
- Okay this was weird the text both T-Centralen and Södermalmstorg appeared in the text fields. I guess this has something to do with this kind of prototype..? Anyhow I'll continue

- I have some options of suggested itineries, I want this one (Taps the travel)
- Here is some new stuff. Hmm. Green usually indicates where one wants to be at, therefore I'll be placing myself in the green part of the train. (Points on the train displaying crowding information)

- No wait there's a small pink arrow here. That color is the same as the text instructiong me on which exit to take, that's where I'm suppose to stand right?! But is that in the front or in the back of the train? Hmm. I'll clock this questionmark and see if it provides any info. (Clicks (?)-symbol)

- Aha so this tells me how croeded the train is. I get it, obviously here I'll have to choose between having a seat or be close to my exit. 

Reflection

I'm happy with the result of the think aloud the behaviour of the user was corresponding very well to how we'd expected. The familiarities with the already existing SL application makes navigating a breeze if you are already familiar with that it seems. The tester never went silent during the assignment either which indicates that the app doesn't require the highest level of counciouss decisionmaking that interfears with spoken language that Gulan mentioned on his lectures.


Think- Aloud - Niklas Lindqvist


The assignment given was to find, with help from the prototype, the fastest way from T-centralen to Södermalmstorg in Stockholm. The user was Anna, a 20 year old student at KTH.

Part 1 - The App

Translated notes:

- Okay, ah, I think i should use this app. I recognize it since i have a similar one on my phone.

(clicks the icon)

-wow! it works. Ill try to write the start point here.

 (clicks upper bar)

-Oh, alright it did it for me. Nice.

(pushes the search button)

-Oh, Okay. I guess I'm done now.

- Oh nice, there is some crowding information I guess (points at the train in the application), and also witch exit i should use.

Questions:

Q1: What is new in this prototype compared to yours?

- It shows crowding information and exit.

Me: If you press the "?" what happens.

-Oh, okay, it shows me information about the picture of the train, I understand.

Q2: What do you think about the changes?

I like them, i would like to have this in my existing app.

Part 2 - The images

Q3: what do you see in these images?

- I can see the same arrows as the once used in the app. probably pointing towards the exit.. And also that the dots represents the exits at the information sign.

- Oh, i see that the color also show on the map, that is cool. Does this map exist at the stations?

Me/Q4: no, its made in Photoshop. Do you think there are any improvements to be done?

- I would like to see the crowding information on the platform as well, since i do not check my phone every time i travel. Also the red text might be reduced to only the word red. Its a bit to much color i think.  

Individual think-aloud

Female, 20's, technology-savy, on-and-off metro commuter:

So I'm at T-Centralen and I'm going to Södermalmstorg...

I'm not absolutely certain where Södermalmstorg is, so I open the SL-app, it knows where I am and I input "Sodermalmstorg". I only have to input "sö" and tap the correct suggestion, easily done.

Given that it uses locations known to the app, I feel that I should not have to confirm the route again, but that's fine.

I get suggestions of arrangements for my route, and I pick the first one without thinking about it further. Perhaps I'm slightly frustrated by the previous seemingly excessive confirmation.

I see that I'm supposed to take the red line, so I look up from the app and make sure that I'm walking in the right direction.

Having spotted a sign with a red arrow directing me to the platform for the train towards Norsborg, i return my gaze to the app.

I see that I want to be toward the left side of the train (as viewed from the platform), to disembark nearest to the pink station exit. I return the phone to my pocket and continue walking toward the platform.

I arrive at the platform and see that the trains toward Norsborg are on my left. This means that I want to sit in the opposite end of the train, so I start walking along the platform.

I look at my phone again to make sure that I'm not mistaken. I never closed the SL-app so it's still showing me the same route arrangement. I see that it had indeed indicated the left side of the train. Pink exit — that bit I remembered more clearly.

I notice that the coming train is crowded near my exit, which makes me less motivated to keep walking toward it. I'm at mid-platform and there should be some seats there on the train, so I stop and wait the remaining minute before the train arrives. Sitting, if only for about 5 minutes, will be nice.

I close the app to read some mails, making a last mental note: Pink.

Friday, 29 April 2016

Seminar 2 - Summary

Recollection of discussed topics during seminar 2

  • We have learned the importance of evaluating, but sometimes it is hard to user-test something beforehand (scale, patents, secrecy). We also discussed ways to circumvent this.
  • For testing our own design, we could use testing in the wild: adding markers and prototypes to the SL stations, and have people try to accomplish tasks (getting from A to B while using our prototype app). This would be testing in a natural setting involving users.
  • We could use people from Copenhagen (which has a similar system in place) to heursitically evaluate our prototype and tell us what they feel are the good parts and bad parts of our system when it is adjusted to Stockholm.
  • We could also take Stockholmers to Copenhagen and let them see what they like and don’t like about that system, and see how they compare it to stockholm.
  • This would be be a kind of triangulation: we see the problem both from the perspective of users who have used it for a long time, and users who are using it for a first time. Their combined heuristics would give us a better view of the actual good and bad sides of our idea.
  • Also, Opportunistic Evaluation is a thing that we can actually, practically do (not assuming infinite resources etc). We could even ask the group we’re presenting to what they think, since they are almost surely users of the public transportation. We can also interview people in the subway and present our design to the, ask what they think.
  • We discuss how we should evaluate the different parts of our designs, since it is quite broad. It might be good to evaluate each part on its own, ut we also need to evaluate the whole together since we need to know how well the prats cooperate.

Wednesday, 13 April 2016

Design step 2 - Parallel design

For the second part of the design step we split into two groups, we were given the same pain point with the goal to create a design centered around it. The chosen pain point was: Being unsure on what exit to take. We gave it about 40 minutes before sitting down to compare the designs. To our surprise, both managed to create very similar designs, both featuring an application with some modification to the station.
Low-fi prototypes of both designs

Both groups had used the existing SL-app as a base for the design and then expanded on it. With the pain point being what exit to take, we had the idea of colouring or assigning a letter to the exit so that when looking at your planned route, you could easily see what exit to take. Using colours to distinguish between the exits allowed us to use the already existing "T" that people are used to seeing. As it is something familiar to the user and as such, takes little getting used to.


When it came to making changes to the actual station we were basically on the same page yet again, changing the signs to reflect what exit they point at (pink, grey, blue, A, B). One group also had the addition of arrows on the ground that you could follow to the exit. The visibility and if it's easy to find your arrow when there's a lot of exits or on a crowded platform is something to consider.


Detailed exposition of the design progress in group 1

First we considered the situation when a traveller arrives at a platform, and tries to figure out where to go.


We noted that there are signs at the ends and in reasonable intervals along the platforms. These signs describe the exits by street name and occasionally also by important locations in the direction of the exit. Unfortunately these are often insufficient e.g. if the traveller is heading to a parallel street or further away.


The most straightforward improvement would be to add a longer list of streets and locations for each exit. It occurred to us that sometimes travellers don't know any of the nearby street names but only which general direction they want to exit. It therefore seemed appropriate to have maps rather than signs naming streets.


Each of these maps would show all the exits and the nearby surrounding area. Nearby streets and important locations could also be named in the map.


The exits marked in the maps should be colour-coded, perhaps using textures or multiple colours each to make them unique and distinctive. These distinctive colours could then be used to mark or point to exits throughout the station.


Distinctive arrows could be put at each intersection, or lines could be drawn all along the floor. It was noted that floor lines could be obscured during rush hour. It was also noted that coloured arrows could be confusing if seen by themselves without a map, but this did not seem like a major issue since maps would be at all entrances and at intervals on the platforms. Furthermore, in places where there's no place for a map, where today there's only a sign that names the street the exit opens up to, in those places the same street could be named in addition to the colour coding of the sign.


Next we considered the situation before a traveller arrives at a platform — ideally they want to exit the train onto the platform nearby to the exit they want off the platform, and for that they need to know where they should position themselves in the train well before arriving at the platform. The best time to make use of this information is before entering the train, while waiting for the train to arrive.


It seemed unreasonable to have all this information displayed statically at each station, i.e. all stations having the map described above for their exits, as well as those maps for every other station on the line (and connecting lines). It did however seem possible to have this information in a dynamic application.


To investigate this we looked at an existing SL schedule app. The app, much like the SL webpage, lets you input start and target destinations, along with planned starting time for the journey, and then it shows you a chronology of evens: Walking to the nearest relevant station, what line to take, when the train will arrive, how long the journey will be, which station to exit on.


In the existing layout of the app it seemed fitting to add a suggested wagon to board (i.e. which end of the train, or sometimes middle). Another good addition would be on the exit station to say which colour-coded exit to head for.


The app lets the user see more detailed information about some items in the chronology by tapping an expansion arrow on such items. Continuing this interface the indication for which wagon to take could be an iconified train with three wagons (as seen from the platform), with the recommended wagon to take marked. For new users who don't understand this icon an expansion arrow could be tapped to show an explanation.


If there was a way to measure real-time seat-availability and/or general crowding in the wagons, this information could be used to improve the wagon recommendations.

We realised that navigating by colour-codes rather than Swedish street names would be especially useful for tourists. Unfortunately tourists would be especially unlikely to have an SL route app. This could be solved by having tourist information at station entrances together with WiFi enabled downloading of the app, or by placing touch-screen interfaces to the app on stations.

Tuesday, 12 April 2016

Individual notes - Seminar 2

When designing a product it is very easy to get stuck in coming up with ideas, thinking about new things to add to the product or just improving the design as you see fit. It is easy to forget that designing should be an iterative process where we should evaluate the product every so often. An obvious reason to why evaluation is needed is because there might be bugs or other problems with the product that are hindering the usability of the product. Finding such problems early in the development cycle is important as the cost and time to fix them increase over time. Another reason to evaluate is to deal with problems that impact the users experience in a negative way. While designing you as a designer might think that your system is intuitive and easy to understand, but a new user might experience it as nonintuitive and difficult to use. I think many of us have experienced this with webpages where it feels like it's impossible to find what you are looking for, only to find out that you have been searching in the wrong place. 

On a lecture, Jan Gulliksen mentioned two types of evaluation: Empirical and Analytical evaluation. These could both be used during a formative evaluation during the design process to test prototypes. I feel that analytical evaluation is a lower budget evaluation if you can't afford setting up a test lab, if the test can't be performed with test subjects (for example: too dangerous) or if you are standing between solutions that are similar, costly to develop, and can be predicted. The empirical evaluation, I feel, will yield more interesting, qualitative data. It might be costly to use, as you need test subjects, a test environment and a way to record the data, but the information you get will be from the users, the people that will be the ones to use the product. Personally I feel that involving the users is the preferred method.  

An example of an analytical method is the KLM method where you break down a task into individual keystrokes. An important thing to have in mind is that there can be different ways to perform the task depending on if the user is experienced and knows shortcuts or if the user is inexperienced and takes the long route. When the "route" is known you can calculate the time it takes to press the keys and even move the mouse using a formula. An empirical method is the Thinking-out-loud, where the actions on the user and the voice of the user will be recorded. While testing the product the user will think out loud, hence the name, talking about how and why it does certain things. This test is very dependant on the user, as doing two things at the same time can be difficult, especially if you get stuck. Getting some biased results will also be the case, as you'll want an observer in the same room in case the user gets stuck. 

My question is: What evaluation method should we use on our design this early in the process, and why?

Individual notes - seminar 2

Today, tech industry is obsessed with metrics - every decision must be evaluated, every change is A/B tested, and hard numbers are king. I've often wondered how useful this data-driven approach is in practice, since they often only collect quantitative data, and does not focus as much on the reasons behind the numbers

Therefore, I found it interesting that the book takes up other approaches than using technology to evaluate designs on your target group quantitatively. Measuring usability using e.g. interviews and think-alouds can give additional context to the feedback from the evaluation that helps understanding

On the other hand, collecting quantitative data from the use of the product when it is actually has the upside that it more accurately reflects how the product is used in the intended setting. Collecting qualitative data could interfere with the user in its testing of the design, which may bias the results.

I found that heuristic evaluation was very interesting. My view of usability was that it can often be counter-intuitive, since elements of a design may interact with each other in ways that are not obvious. However, using heuristics such as Fitts' law seems like it could provide useful information despite this. So while it is very hard to evaluate usability without getting feedback from users, heuristics could have great use with when testing certain properties.

My question for the seminar is: in what ways can we collect qualitative without interfering with the user, to avoid introducing bias.

Individual notes, Seminar 2 - Niklas Lindqvist

Chapter 13 – Introducing Evaluation
This chapter presents an introduction on how to evaluate a design. It focuses on both the usability of the design and the user’s experience/satisfaction.

The problem with a design often occur when the producers find the product useful but don’t understand that other users don’t understand how to use it. This I find true in numerous of cases, for example webpages where it’s almost impossible to find what you are looking for. Evaluation of a product enables them to check that their design fit others as well, and should probably be used more often.

There are 3 main types of evaluation:
  • Controlled settings involving users (labs, everything is measured)
  • Natural setting involving users (field work)
  • Any setting not involving users (models and analytics)
Doing a combination of the evaluations is something I would like to aim for in our project following something similarly to:

Chapter 14 - Evaluation studies: From controlled to natural settings

Chapter 14 describes how to evaluate in different types of environments. For example controlled lbs and natural settings. Usability testing is the focus of the chapter.
An interesting concept is the in the wild studies where the researchers are far away and monitor the user with different methods let the users act more “natural”. This is a study that probably have become much easier to implement with new technology and might be improved even further in the future.

Chapter 15 - Evaluation: Inspections, Analytics, and Models

Inspection evaluation methods are in focus of this chapter but I find the Predictive model to be the most interesting. In Fitts' Law where predicting the time it takes to complete a small task with a pointing device such as the mouse on a computer can be used to estimate the total time of a complex task in the same program. This could be develop further using time it takes to press certain keys on a keyboard or other bottoms on a special dashboard when the final design in to expensive to produce iterate to its final stat.

Question for seminar:

What sort of evaluation will be able for us to do on our design? 

Monday, 11 April 2016

Third Design Concept


Third Design Concept

In the third design concept we focus on a new pain point: Crowding. The design is based around two simple ideas, the first being a new typ of method for entering the train, and the second one being a clear information board regarding the crowding information on incoming trains. 


The new doors are integrated in a glass wall along the platform making sure that you can not fall down on the railway. This would hopefully create new space for the passengers waiting for the train since you now can stand closer to the edge of the platform without being afraid of falling down on the rail. The platforms is around 150-200 meter and today around half a meter to the edge is not in use. This means that there is 75-100 m^2 of space wasted on the platform today but with the new doors this might be used more efficiently.

Guiding arrows on the ground to help people locate their wanted exit and marked areas on the ground close to the entrance to make sure that passengers entering the train are not in the way when people are exiting the train.

The goal of the new board is to give travelers on the station information on the upcoming trains crowding level to help the travelers position them self depending on their preference. If a passenger wants a free seat they should know where to be standing to increase their chances of getting it.